Broadcasting during a Webinar
Speaker\Participant in the Webinar Event (Browser)
Webinar - Listeners only see the speaker and moderator and can ask questions
By default, the event speaker has the following functionality available:
Buttons in the middle of the screen:
- Reaction image.png
- Microphone (off\on) 6.png
- Camera 7.png
- Display additional content 8.png
- Additional settings 9.png
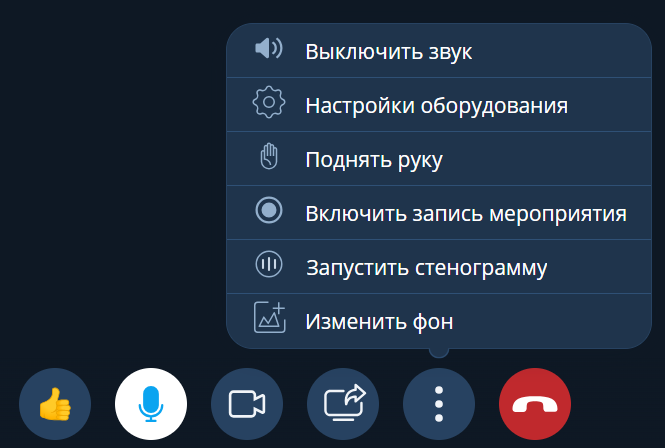
- Mute
- Equipment settings
- Raise hand
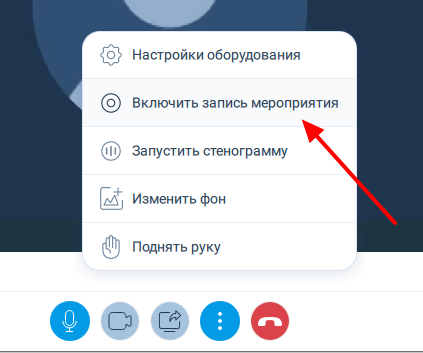
- Start event recording
- Start stenography
- Change the background (behind the speaker)
By default, event participants have the following functionality available:
Buttons in the middle of the screen:
- Reaction image.png
- Sound (off\on) image.png
- Equipment settings image.png
- Raise hand image.png
- Leave the event image.png
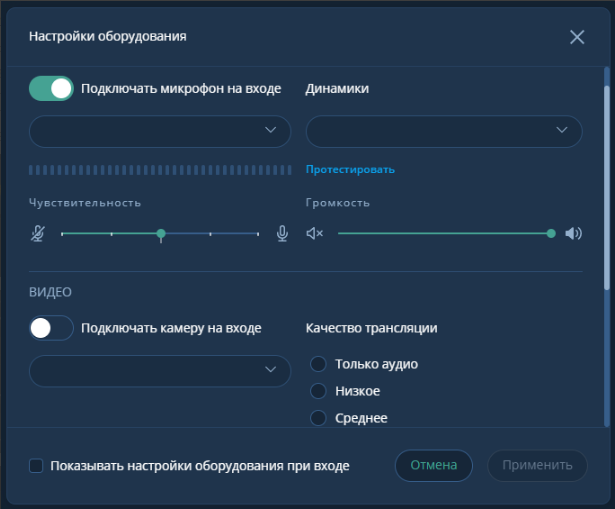
Figure 1 - Equipment settings
 Figure 2 - "raise hand"
On the right side, the chat block has the following functionality available:
- Files image.png
- Whiteboard image.png
- Polls image.png
- Add participant (plus)

On the right side, the visual functionality is available:
- Chat image.png
- Participants image.png

Inviting participants during the Webinar Event (Browser)
Creating a Webinar Event
- Log in to your account with Login and Password
- Go to the "Participants" section and click (plus) to add those who should participate in the event 2.1. First method: select each participant separately. 2.2. Second method: add a group of participants separated by commas (up to 300 people) 2.3. Third method: click (plus) and select "Share link" and send it to participants in the most convenient way
Inviting participants during the Webinar Event (PC Application)
Creating a scheduled Webinar Event.
- Log in to Desktop with Login, Password, and Server Name
- In the "Additional settings" section, make the main event settings
- Add necessary participants by clicking (plus)
- Or: select each participant separately. (in the search bar)
- Assign rights to invited participants (by clicking "three vertical" dots)
Recording\viewing\demonstration of event recording (Browser)
- Start the event in the WEB browser
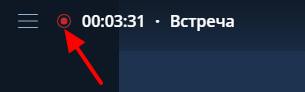
- Click the "three vertical" dots and select "Start event recording"

- A recording icon will appear in the upper left corner
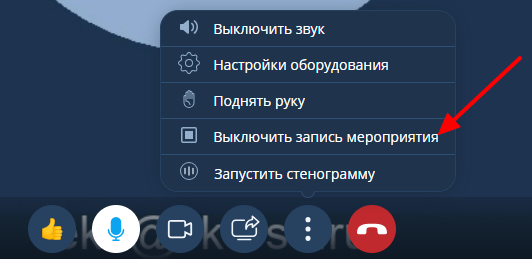
- After the event, click the "three vertical" dots and select "Stop event recording"
- After recording, an informational message will pop up in the lower left corner of the browser window
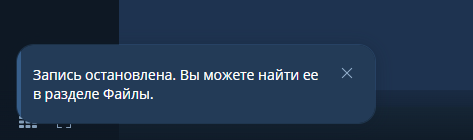
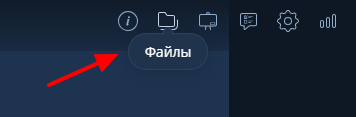
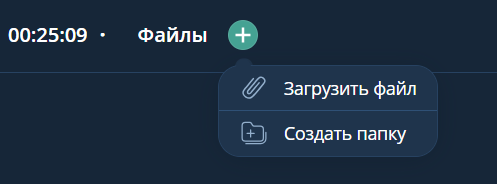
- Go to the "Files" section in the upper right corner of the browser window
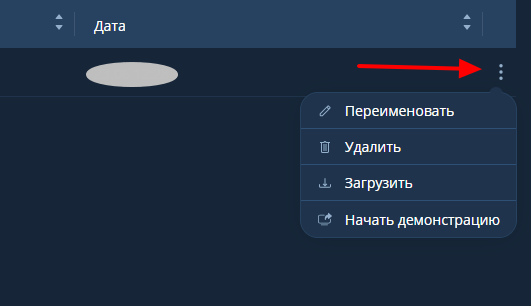
- In the opened window, select the necessary file from the list.
7.1. Clicking on the selected file will automatically start playback.
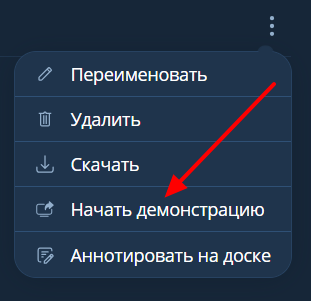
7.2. In the properties of the recorded video, you can perform the following actions:
- Rename
- Delete
- Download
- Start demonstration
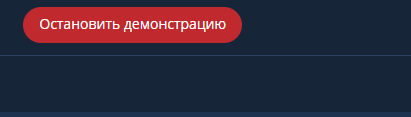
- By selecting "Demonstration," the selected file will start being demonstrated in the event
8.1. It can be stopped at any time by clicking "Stop demonstration"
Recording\viewing event recording (PC Application)
Start the event in the PC Application
Click the "three vertical" dots and select "Start event recording"
A recording icon will appear in the upper left corner
After the event, click the "three vertical" dots and select "Stop event recording"

- After recording, an informational message will pop up
image.png
- Go to the "Files" section in the upper right corner of the browser window
image.png
- In the opened window, select the necessary file from the list.
7.1. Clicking on the selected file will automatically start playback.
7.2. In the properties of the recorded video, you can perform the following actions:
- Rename
- Delete
- Download

Scaling and presentation of the presentation (Browser)
Start the event in the Browser
In the upper right corner, click on the "Files" button image.png
In the opened window, "drag" or "upload" the necessary files

- Or add through the "+" functionality in the upper left corner of the window
- After adding the file, wait for the conversion to complete

- Then click the "three vertical dots" in the attached file row and select "Start demonstration"
- Then use the "+" or "-" buttons to zoom in\out the displayed content to fit the screen size

- To scale the displayed content, you can use the button "to screen size"

- During the demonstration, you can use the "pointer" tool for
